I went camping a few weeks back and my small workshop is also partly my storage shed for the camp gear. Dust had settled everywhere, in camp chairs, nooks and crannies and just anywhere that it could. Unfortunately, my solution of ‘just sweep regularly’ isn’t exactly the best way of keeping dust down and with it coming into winter here, there is going to be a lot more time spent inside the shed working, rather than taking the tools into the yard. So I needed a cheap and easy dust removal setup.
How does a Cyclone separator even work?
The Cyclone separator is a step between the vacuum and the workpiece. The reason that they are used so much is because vacuums will lose suction if they become overloaded with dust and will have to work harder than necessary to get the same result.
You plug your vacuum into the cyclone and then another hose that will be your suction at your workbench. Due to the layout of the cyclone’s input, the dust hits the walls, loses momentum and tends to drop lower in the container where it isn’t picked up by the suction of the vacuum. So, less sawdust in the actual vacuum filter, ongoing consistent suction and a handy bucket of wood dust and bits is the result (It’s also great for people like me constantly vacuuming screws or tools – no having to try to empty a vacuum bag for me…)
Now I could have just gone on to Amazon and bought something like this for around $20 and attached to a bucket, but it was a week wait and the dust needs to be dispelled NOW. Also, as previously mentioned, I am very much in a DIY mood and figured why not give it a try.
The Budget Dust Cyclone Supplies list
My supplies list:
- A 10L Bucket with a lid
- ~40mm 90degree PVC fitting (45 degree, anything with an angle will work)
- ~40mm Straight PVC coupling
- A length of pool hose
For the hose, I just went to the pool section for a $5 piece of hose, with PVC fittings in hand, it was easy to get the right fit. If it is loose, and depending on your fittings, a hose clamp, tape glue will fix it.
I already had the bucket, and a shop vac, but also a few other things that I needed to build the dust cyclone.
Total Cost – around $11 (another $10 for a brand new bucket).
Tools:
- Hole cutting bit, drill bit or sharp knife
- Glue for PVC
- Rasp or Bastard file – nothing fancy needed.
Building the Dust Cyclone
The setup is pretty easy, really.
Make a hole in the lid of the bucket – I offset mine to one side so that it didn’t suck straight from where the dust was coming into the bucket.
Make a hole in the side of the bucket – in the top 1/3 of the bucket. You want the dust to be able to hit the walls and lose momentum. Too high and it will go straight into the vacuum, too low and you will be emptying it too often.
Fittings – the straight one goes in top, the angled one in the side. Point the angle at around 45 degrees to the horizontal, otherwise the dust will shoot straight to the bottom and back up again (to the vacuum).
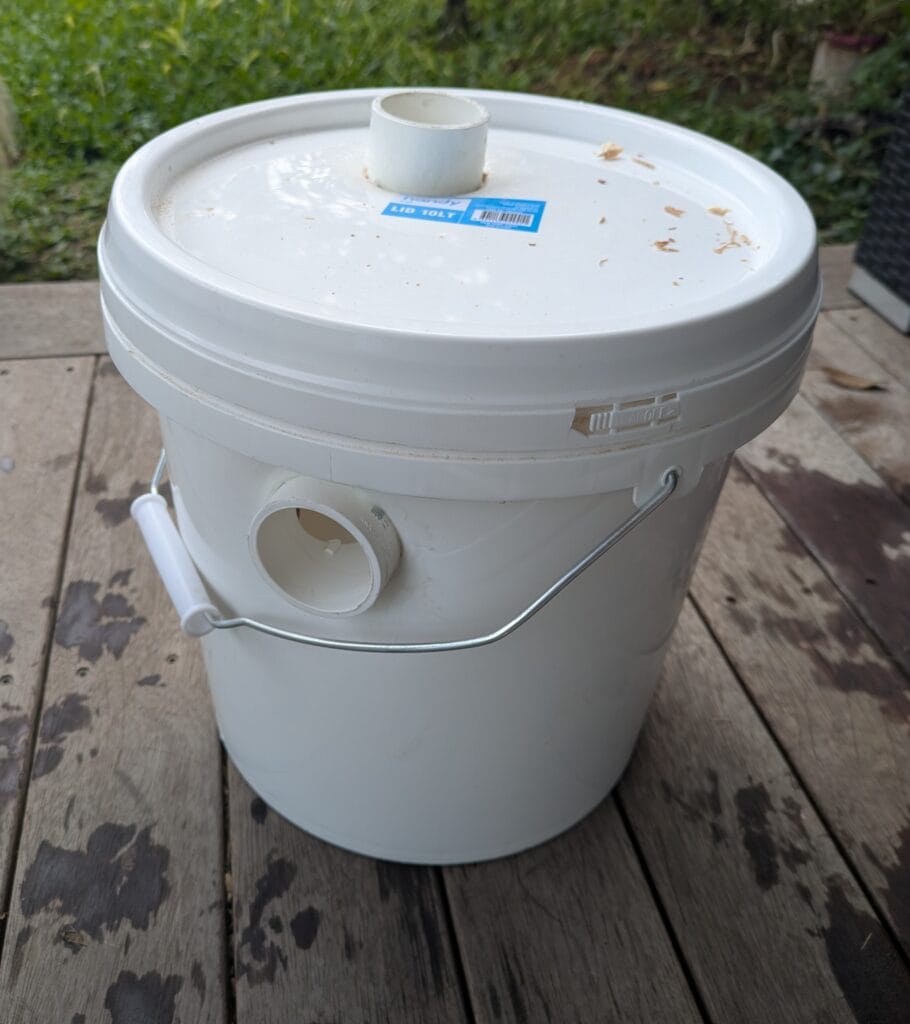
It took a little finesse to get the fittings in, a sharp knife or file is good for getting them fitting just right. They need to be nice and snug, then seal around them with your glue. GIVE IT TIME TO SET..otherwise you may be dealing with dust being pulled into glue and that’s just going to create a mess.
Give it all a test by placing your vacuum hose into the top fitting and turn it on, you should be getting the same amount of suction from the side fitting as you would direct from the vacuum itself. If you seem to be losing suction (or have none at all), check for leaks around the fittings first, and then the bucket itself.
Using the budget Dust Cyclone
At the moment I am just using the Budget Dust Cyclone in a ‘as needed ‘ application – just bringing it close to where I need it. I kept the handle on the bucket and it actually has served a purpose by being able to hang it closer to my workpiece to get better access with the hose.
But I intend on doing a few updates:
- PVC pipe and fittings on my work bench to plug the hose into so I can get suction in several spots at once.
- Some simple hose connectors on my table router and bandsaw
- A few saddle clips attached by one side only to slot the hose in where needed.
Issues I have run into
- Currently I am using single length of the pool hose, which is pretty stiff and can easily pop out of the fitting if pulled around. To fix this I will be buying something like this dust collection hose somewhere down the track.
- Due to the Cyclone being all inclusive (dust collection and cyclone are one, rather than the cyclone on top) there is the risk of larger pieces of debris being pulled into the vacuum as the bucket fills and the blocks the hose, leading to a loss of suction. My solution to this is going to be putting some screen door mesh over the vacuum fitting, so that large pieces cannot get through.
- Lastly – given it is a single piece, the bucket can fill up pretty quickly if doing rough work or work that involves lots of shavings and not just dust. No real solution to this one except to just empty regularly. The other option I have seen is cutting a hole in the bottom of the bucket and snugging it inside another for dust, but that seems too much for my needs.
Overall, the budget Bunnings Dust Cyclone has been a useful addition to my workshop – a few tweaks are needed, bit otherwise feeling pretty good about it. If you are woodworking and weight is an issue – check out my Hardness and Wood Weight calculator – it can help to work out what final weight you are looking at for your project for a massive range of local and exotic woods.